目次
- 利用するツールについて
- テストの準備
- テストの作成
- テストの実行
- テストレポート
このページを読む前に
このページの内容はテストの内容を読んでいる前提で記述していますので、テストの記述などについてはユニットテストの項目を参照すると理解しやすいです。
利用するツールについて
この章ではテストツールとしてEspressoを利用します。
Espressoは、Googleが公開したAndroid用のUIテスティングフレームワークで、2015年5月現在Android support libraryでサポートされているため、ここではEspressoを利用します。
Espressoは、JUnit4が使えるため従来に比べ記述方法がシンプルになるなど利点が多いため、UIテストをする場合には積極的に活用していくのがよいでしょう。
JUnit4はJavaの単体テストを行うテスティングフレームワークです。
UIに関連のないユニットテストを行うためにはRobolectricの方が高速にテストを実施することが出来ます。(現在のところRobolectricについては解説しません、後日追記するかもしれません)
テストの準備
テストを実施する前に何点かテスト対象のモジュール内のbuild.gradleの編集が必要になります。
dependenciesの追加
build.gradleのdependenciesに下記の2行を追加します
dependencies {
    androidTestCompile 'com.android.support.test.espresso:espresso-core:2.0'
    androidTestCompile 'com.android.support.test:testing-support-lib:0.1'
}
LICENSE.txt等のファイルの重複エラーが出た場合はgradleのエラーメッセージに従い、下記のような記述を追記するとよいでしょう。
android {
    packagingOptions {
        pickFirst 'LICENSE.txt'
    }
}
testInstrumentationRunnerの設定
同じくbuild.gradleのdefaultConfigのtestInstrumentationRunnerにandroid.support.test.runner.AndroidJUnitRunnerを設定します。
android {
    defaultConfig {
        testInstrumentationRunner "android.support.test.runner.AndroidJUnitRunner"
    }
}
ここまで出来たら一度ビルドを実行してみるとよいでしょう。 エラーが発生する場合は、gradleのエラーメッセージを見ながら解決していきましょう
テストの作成
AndroidStudio上でテスト対象のファイル内でcmd+shift+t または、クラスのクラス宣言にカーソルを合わせ、alt+EnterCreate Test を選択します。
すると、下記のようなダイアログが表示されます。
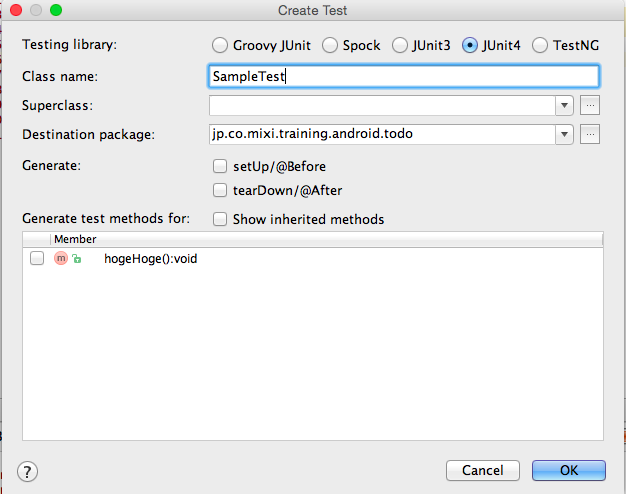
これ以降の説明でJUnit4を使うので、JUnit4を選択します。(別のtesting libraryを選択したい場合はそれを選んでも構いません)
setUp/tearDownのチェックボックスは必要に応じてチェックを入れてください。
また、テスト対象のメソッドにはチェックを入れておくと自動生成されるので便利です。
OKボタンを押下すると、Diredtory Structureの選択画面になります。
ここでは、src/androidTest/java/以下のものを選択します。
すると、下記のようなファイルが作成されます
package com.example.sample;

import org.junit.After;
import org.junit.Before;
import org.junit.Test;

/**
 * Created by XXX on yy/mm/dd.
 */
public class SampleViewTest {

    @Before
    public void setUp() throws Exception {

    }

    @After
    public void tearDown() throws Exception {

    }

    @Test
    public void testNewView() throws Exception {

    }
}
これでテストファイルの作成が出来たので一度テストを実行してみましょう。
その際、Androidの実機、またはエミュレータが必要なので、利用できる状態にしておくとよいでしょう。
右クリックメニューからRunを選択します。この時androidのシンボルのついたテストを選択します。
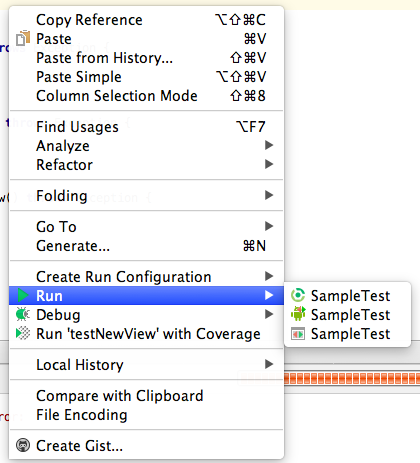
何も記述していないので無事テストが完了すると思います。
また、AndroidStudioのビルドシステムはgradleに統一されているため、コマンドラインからテストを実行することも出来ます。
その場合は、下記コマンドで実行出来ます(テストが全部実行されます)
./gradlew connectedAndroidTest
テストメソッドの作成
テストクラスが作成できたらテストメソッドの実装をしていきます。
JUnit3の場合はメソッド名をpublic void testXXX()なメソッドがテスト対象のメソッドでしたが、JUnit4ではメソッドにアノテーションを付けることによりテスト対象のメソッドかを判断します。
そのため、下記のような記述をすることによりテストとして実行されます。
    @Test
    public void method() {
        String hoge = "hoge";
        assertEquals( "hoge", hoge );
    }
また、@Testアノテーションにexpected 属性を付与すると、そのテストメソッドは例外が投げられる事を期待するテストメソッドとなります。
異なる例外がThrowされた場合、または例外がThrowされない場合はテストが失敗します。
    @Test(expected=NullPointerException.class)
    public void ぬるぽ() {
        String hoge = null;
        hoge.length();
    }
Androidのテストを実行する場合、多くのケースではContextが必要です。Contextが必要な場合は InstrumentationRegistry.getContext();で取得ができます。
    @Test
    public void method() {
        TextView view = new TextView(InstrumentationRegistry.getContext());
        view.setText("sample");
        assertThat(view.getText().toString(), is("sample"));
    }
EspressoのMatcherを活用する
EspressoにはViewのテストをするために便利なMatcherが用意されています。
これらを活用するとViewのテストが効率的に記述することができるようになります。
Espressoに関するドキュメントは公式ドキュメントを参照するのがよいでしょう。
ここでは、頻繁に利用する主要なメソッドについて簡単に説明します。
主要メソッドのimportをする
Espresso, ViewActions, ViewMatchers, ViewAssertions, Matchers などの主要 static メソッドを import static で定義しておくと良いでしょう。
static importをしなくても、使えますが記述をわかりやすくするために必要に応じてstatic importしておくのが便利です。
import static com.google.android.apps.common.testing.ui.espresso.Espresso.onData;
import static com.google.android.apps.common.testing.ui.espresso.Espresso.onView;
import static com.google.android.apps.common.testing.ui.espresso.Espresso.pressBack;
import static com.google.android.apps.common.testing.ui.espresso.action.ViewActions.click;
import static com.google.android.apps.common.testing.ui.espresso.action.ViewActions.closeSoftKeyboard;
import static com.google.android.apps.common.testing.ui.espresso.action.ViewActions.typeText;
import static com.google.android.apps.common.testing.ui.espresso.assertion.ViewAssertions.matches;
import static com.google.android.apps.common.testing.ui.espresso.matcher.ViewMatchers.assertThat;
import static com.google.android.apps.common.testing.ui.espresso.matcher.ViewMatchers.hasContentDescription;
import static com.google.android.apps.common.testing.ui.espresso.matcher.ViewMatchers.hasFocus;
import static com.google.android.apps.common.testing.ui.espresso.matcher.ViewMatchers.withId;
import static com.google.android.apps.common.testing.ui.espresso.matcher.ViewMatchers.withText;
import static org.hamcrest.Matchers.allOf;
import static org.hamcrest.Matchers.containsString;
import static org.hamcrest.Matchers.instanceOf;
import static org.hamcrest.Matchers.is;
Espresso.onView
Matcherを渡すと、一致したViewのViewInteractionを返します。
このViewInteractionに対して、クリックなどの値のチェックなどを指定できます。
ViewMatchers.withId(int id)
findViewByIdと同じく、ViewのIDを渡すと一致したViewのViewMatcherを返します。
ViewInteraction.check(ViewAssertion)
引数で渡されたViewAssertionでViewの状態を検査します。
ViewMatchers.isDisplayed()
Viewが表示されているかを返すメソッドです。
ViewMatchers.withText()
Viewが持っているテキストが一致するかを返すメソッドです。
これらを利用すると、下記のような書き方ができます。
下記の例はid=hogeのTextViewのテキストの値が”hoge”であることをテストしています。
    @Test
    public void method() {
        Espresso.onView(ViewMatchers.withId(R.id.hoge)).check(ViewAssertions.matches(ViewMatchers.withText("hoge")));
    }
また、static importを活用すると下記のように書くことが出来ます。
    @Test
    public void method() {
        onView(withId(R.id.hoge)).check(matches(withText("hoge")));
    }
テストの実行
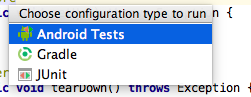
AndroidStudio上からテストを実行する場合は、テストクラスでctrl+shift+Rでダイアログが表示されるので、Android Tests を選択すると実行することが出来ます。
コマンド
コマンドラインからテストをする場合はgradleから実行することが出来ます。
その場合、テストはconnectedAndroidTestタスクで実行することが出来ます。
CIサーバー上で実行する場合もconnectedAndroidTestを追加するとテストが実行されます。
./gradlew connectedAndroidTest
テストレポート
AndroidStudio上で実行した場合は、画面上に結果が表示されると思います。
テスト結果のレポートは
[実行したモジュールのパス]/build/outputs/androidTest-results/connected/
以下にxml形式で出力されます。CIサーバーなどを利用している場合、このxmlを結果として渡せば、適切に処理してくれると思います。
また、[実行したモジュールのパス]/build/outputs/reports/androidTests/connected/
以下にhtml形式でも出力されています。
手元で確認したい場合には、こちらの方が便利でしょう。
実習・課題
プロジェクトの開き方は課題プロジェクトの開き方を参照してください。
実習
この実習では 1-11-TestPracticeを使用します。
- TestTarget1 クラスに対応する AndroidTestCase を書いてください。
- TestTarget2 クラスを変更し TestPactice2 のテストを通るようにしてください。
- TestTarget3 クラスに対応する ActivityInstrumentationTestCase2 を書いてください。
課題
この課題では 1-11-TestAssignmentを使用します。
- MainActivity を変更し、MainActivityInstrumentationTestCase のテストを通るようにしてください。
- 1 の課題で使用するテストケースを、Robotium を用いて記述してください。
- 1 の課題で使用するテストケースを、UIAutomator を用いて記述してください。